Discover the art of creating nourishing body butters with natural ingredients like shea, mango, and coconut oil. Customize recipes for soft, glowing skin and explore DIY tutorials in PDF guides for easy, homemade skincare solutions.
1.1 What is Body Butter?
Body butter is a rich, luxurious skincare product made from natural ingredients like shea, mango, and coconut oil. It typically has a soft, whipped consistency or a thicker, balm-like texture. Designed to deeply moisturize and nourish the skin, body butter is often used to combat dryness and promote soft, healthy-looking skin. Unlike lotions, it tends to be more concentrated, offering long-lasting hydration and protection.
1.2 Benefits of Using Body Butter
Body butter is a rich, natural moisturizer that deeply hydrates and softens the skin. Enriched with shea, mango, and coconut butters, it provides long-lasting hydration. It’s free from harsh chemicals, making it ideal for sensitive skin. Regular use helps protect against dryness and environmental stress, leaving skin smooth and radiant. Body butter also nourishes and repairs skin, promoting a healthy, glowing complexion with consistent use.
1.3 Why Make Your Own Body Butter?
Making your own body butter allows you to customize ingredients to suit your skin type and preferences. It avoids harsh chemicals found in commercial products, ensuring a natural, nourishing solution. Homemade body butter is cost-effective and fun to create, offering the freedom to experiment with scents and textures. With simple recipes, you can craft personalized skincare products that promote healthy, glowing skin while avoiding artificial additives.
Types of Body Butter Recipes

Explore various body butter recipes, including shea, mango, and whipped options, each offering unique textures and benefits. Customize them to suit different skin types and preferences naturally.
2;1 Shea Butter Body Butter Recipe
This shea butter body butter combines shea butter with coconut oil and vitamin E oil for a rich, moisturizing blend. Melt the ingredients, whip until fluffy, and customize with essential oils for scent. Perfect for dry skin, this recipe offers long-lasting hydration and skin protection, making it a popular choice for homemade skincare routines.
2.2 Mango Body Butter Recipe
Mango body butter blends mango butter with almond oil and beeswax for a lightweight, tropical treat. Its silky texture and fruity scent nourish and hydrate the skin. Whip the ingredients until smooth and add a touch of essential oils for a refreshing finish. This recipe is ideal for all skin types, offering deep moisture and a natural glow with each application.
2.3 Whipped Body Butter Recipe
Whipped body butter creates a fluffy, airy texture by blending shea butter, coconut oil, and essential oils. Whip ingredients until light and smooth for a luxurious feel. This recipe absorbs quickly, leaving skin soft and moisturized without greasiness. Customize with scents like lavender or vanilla for a personalized touch, perfect for daily use or as a gift. Its light consistency makes it ideal for warm weather and sensitive skin.

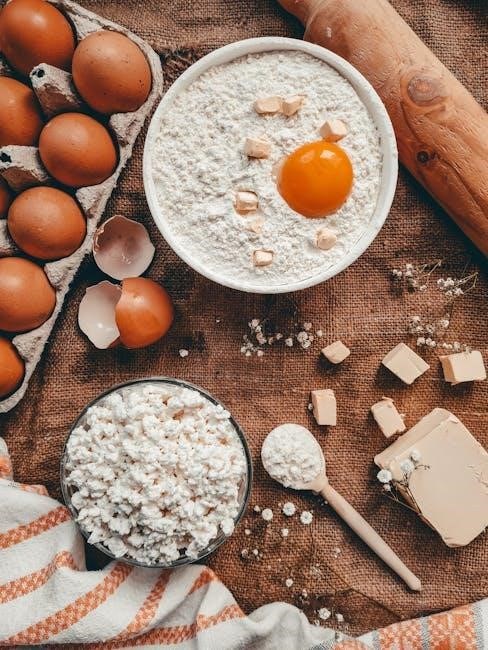
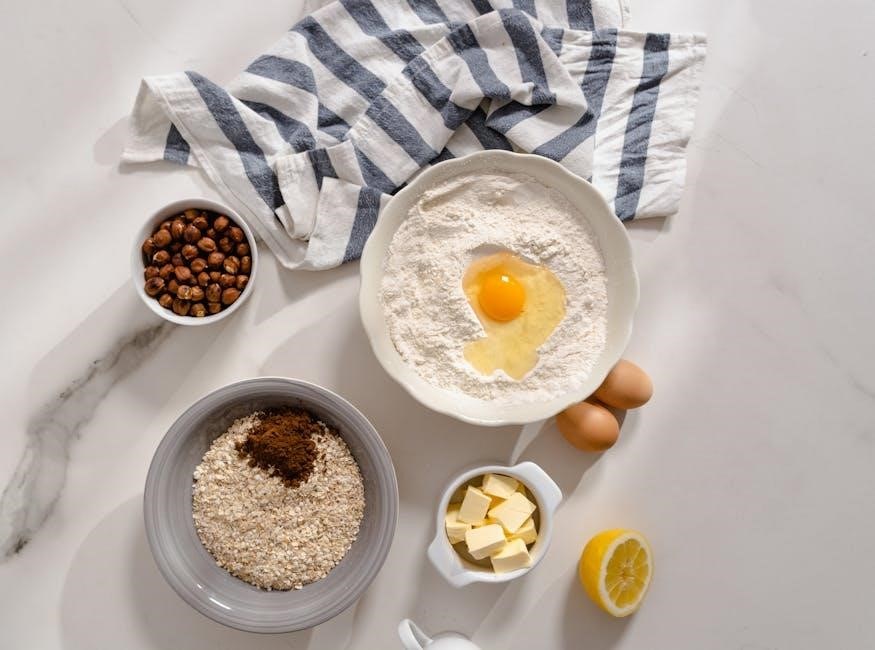
Ingredients for Body Butter
Natural oils like coconut, shea, and mango butter, combined with essential oils, form the base of body butter recipes. These ingredients provide hydration and skin nourishment.
3.1 Natural Oils and Butters
Natural oils such as coconut oil, almond oil, and jojoba oil are essential for their moisturizing properties. Butters like shea, mango, and kokum provide intense hydration and a luxurious texture. These ingredients are rich in vitamins and antioxidants, making them ideal for nourishing and protecting the skin. Blending them creates a perfect base for homemade body butters tailored to different skin types and needs.
3.2 Essential Oils for Scent and Benefits
Essential oils enhance body butter recipes with fragrance and therapeutic properties. Lavender oil promotes relaxation, while peppermint invigorates the senses. Frankincense and geranium oils offer skin-rejuvenating benefits. These oils can be blended to create unique scents and tailor the product to specific skin concerns, such as acne or dryness, making each batch personalized and effective for various skincare needs.
3.4 Substitutes for Common Ingredients
If you’re out of shea butter, coconut oil, or other staples, substitutes like mango butter, almond oil, or jojoba oil can work. For essential oils, opt for similar scents or benefits—e.g., lemon for orange. Replace vitamin E oil with aloe vera for hydration. These swaps maintain quality while offering flexibility, ensuring your body butter remains nourishing and effective. Always choose substitutes that align with your skin type for the best results.
Benefits of Natural Ingredients
Natural ingredients like shea butter and coconut oil deeply moisturize, repair, and protect the skin. They are rich in vitamins and antioxidants, promoting healthy, glowing skin naturally.
4.1 Shea Butter for Skin Health
Shea butter, rich in vitamins A and E, deeply moisturizes and protects the skin. It soothes dryness, reduces inflammation, and promotes collagen production, enhancing skin elasticity and health. Its natural antioxidants combat free radicals, making it a key ingredient in body butter recipes for soft, radiant skin. Ideal for all skin types, shea butter is a natural remedy for dry, damaged skin.
4.2 Coconut Oil for Moisturizing
Coconut oil, known for its hydrating properties, penetrates deeply into the skin, providing long-lasting moisture. It soothes dryness and irritation, making it a popular choice in body butter recipes. Rich in antioxidants and fatty acids, coconut oil helps repair and protect the skin, leaving it soft and supple. Its lightweight texture makes it ideal for various skin types, enhancing the effectiveness of body butter blends.
4.3 Vitamin E Oil for Skin Protection
Vitamin E oil is a powerful antioxidant that protects the skin from environmental damage and promotes healing. In body butter recipes, it helps shield skin cells from oxidative stress, reducing signs of aging. Its moisturizing properties enhance skin elasticity, leaving it soft and radiant. Additionally, vitamin E oil stabilizes other ingredients, ensuring longer shelf life for homemade body butters while providing exceptional skin protection and nourishment.

DIY Body Butter Making Process
Blend natural oils and butters, melt shea or mango butter, mix with coconut oil, cool, whip until creamy, and customize with essential oils for personalized skincare products.
5.1 Basic Steps to Make Body Butter
Melt shea, mango, or kokum butter with coconut oil in a double boiler. Mix in natural oils like almond or jojoba. Allow the blend to cool slightly, then whip until light and fluffy using a mixer. Add essential oils for scent and benefits. Pour into jars, let set, and enjoy your homemade body butter for soft, nourished skin. Customize recipes for texture and fragrance preferences.
5.2 Customizing Your Recipe
Personalize your body butter by adjusting ingredients to suit your preferences. Add essential oils for fragrance or therapeutic benefits. Experiment with different butters like shea, mango, or kokum for varying textures. Incorporate exfoliants like sugar or salt for a scrubbing effect. Adjust the ratio of oils to butters for lighter or richer consistencies. Try unique combinations, such as lavender for relaxation or citrus for a refreshing scent, to create bespoke skincare products.
5.3 Tips for Achieving the Perfect Consistency
Achieve the ideal texture by carefully balancing ingredients and following precise steps. Temper the mixture to 72°F–76°F before whipping to ensure smoothness. Use a hand mixer to incorporate air, creating a fluffy consistency. Avoid overheating, as it can soften the butter excessively. Add a touch of liquid oil for better emulsification and stability. Test small batches to refine ratios and techniques, ensuring a luxurious, even texture tailored to your preference.
Storage and Packaging
Store homemade body butter in airtight, dark glass jars to protect from light and heat. Keep in a cool, dry place for up to six months. Eco-friendly packaging options like recyclable jars or biodegradable containers are ideal for sustainable storage, preserving freshness and reducing environmental impact effectively.
6.1 How to Store Homemade Body Butter
Store homemade body butter in airtight, dark glass jars to protect it from light and heat. Keep it in a cool, dry place like a cupboard or drawer. Avoid direct sunlight and heat sources, as they can soften or melt the butter. For optimal freshness, use within six months. If living in a warm climate, refrigerate to maintain consistency. Choose eco-friendly packaging or recyclable containers for sustainable storage.
6.2 Eco-Friendly Packaging Options
Eco-friendly packaging is essential for sustainable body butter storage. Use biodegradable materials like bamboo jars or recyclable glass containers. Reusable tin containers are another great option, reducing plastic waste. Compostable labels and minimal packaging designs also support environmental conservation. Opt for locally sourced materials to minimize carbon footprint. Ensure all packaging is free from harmful chemicals, aligning with natural skincare principles for a greener, healthier planet.
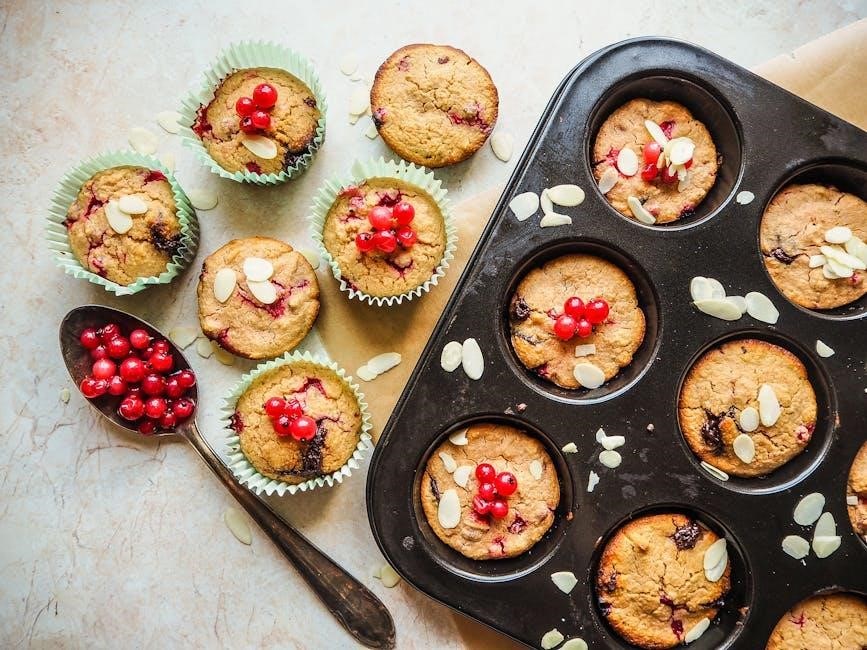
Popular Body Butter Recipes
Explore diverse recipes like sugar cookie whipped butter, lightweight-sensitive skin blends, and lavender-infused creations. Each offers unique benefits, blending natural ingredients for nourished, soft skin tailored to your preferences.
7.1 Sugar Cookie Whipped Body Butter
Indulge in a sweet treat for your skin with this Sugar Cookie Whipped Body Butter recipe. Made with shea butter, coconut oil, and sweet almond oil, it’s lightly scented with vanilla essential oil for a warm, cookie-like aroma. Whip the ingredients until fluffy, then customize with a pinch of cinnamon or nutmeg for extra texture. Perfect for softening skin while leaving a delicate, sweet fragrance. A must-try for dessert lovers!
7.2 Lightweight Body Butter for Sensitive Skin
Perfect for delicate skin, this Lightweight Body Butter combines shea butter, coconut oil, and chamomile essential oil for gentle hydration. Its non-greasy texture soothes irritation and calms redness, making it ideal for sensitive skin. The subtle, natural scent ensures no harsh fragrances, while the blend of natural oils deeply nourishes without clogging pores. A must-try for those seeking a gentle, effective moisturizer.
7.3 Lavender Infused Body Butter
This Lavender Infused Body Butter combines shea butter, coconut oil, and dried lavender for a calming, aromatic moisturizer. The lavender adds a soothing scent while promoting relaxation and skin health. Perfect for all skin types, it absorbs easily, leaving a soft, fragrant glow. The recipe includes vitamin E oil for added protection, making it a gentle, nourishing treat for dry or sensitive skin. Ideal for promoting tranquility and hydration.
Troubleshooting Common Issues
Tackle grainy textures by reheating and stirring until smooth. Prevent oil separation by ensuring all ingredients are fully incorporated during the mixing process for a consistent finish.
8.1 Fixing Grainy Texture
Grainy texture in body butter often occurs due to improper mixing or cooling. To fix, gently reheat the mixture and stir thoroughly until smooth. Ensure all ingredients are fully incorporated before cooling again. This step helps achieve a creamy consistency, preventing a rough feel on the skin. Proper mixing during the cooling process is key to avoiding graininess. Reheating and stirring can restore the desired texture effectively. Consistency is crucial for a smooth application and even absorption. By addressing graininess early, you maintain the product’s quality and usability. Regular stirring during the cooling phase can also prevent such issues from arising. Achieving the right consistency enhances the overall effectiveness of the body butter for skin nourishment and hydration. Proper technique ensures a professional finish, making the final product enjoyable to use. Attention to detail during the mixing and cooling stages guarantees a smooth, luxurious texture. This step is essential for homemade body butters to rival store-bought products in quality and feel. With careful handling, grainy textures can be eliminated, resulting in a velvety-smooth body butter perfect for daily use. Consistent stirring during the process helps maintain even crystal formation, which is vital for a smooth finish. By following these steps, you can create body butters with a professional texture that feels wonderful on the skin. Properly addressing graininess ensures your homemade products are both effective and enjoyable to use. Regular practice will help you master the technique, leading to consistently smooth body butters. The effort to fix grainy texture is worth it for the final result, providing a superior skincare experience. Homemade body butters with smooth textures are not only cost-effective but also customizable to your skin needs. Fixing graininess is a simple process that enhances the overall quality of your DIY skincare products. Ensuring smooth consistency makes your body butter more appealing and effective for daily use. With these tips, you can achieve professional-grade body butters from the comfort of your home. Proper mixing and cooling techniques are the keys to avoiding grainy textures and creating luxurious body care products. By mastering these steps, you’ll enjoy homemade body butters that rival any commercial brand in texture and performance. Consistency and patience are essential for crafting high-quality body butters that nourish and moisturize your skin effectively. Addressing graininess is a crucial step in ensuring your homemade products meet your expectations for smoothness and usability. The end result is well worth the extra attention during the mixing and cooling phases. Your skin will thank you for the effort put into creating a smooth, luxurious body butter tailored to your needs. Achieving the perfect texture is a rewarding process that enhances the benefits of your homemade skincare routine. By following these guidelines, you can confidently create body butters that are both nourishing and delightful to use. The ability to fix grainy textures empowers you to refine your DIY skincare creations, ensuring they are always of the highest quality. With practice, you’ll effortlessly produce smooth, consistent body butters that provide exceptional hydration and care for your skin. The satisfaction of crafting your own skincare products is matched only by the joy of using them, knowing they meet your personal standards of excellence. Fixing grainy textures is a valuable skill that elevates your homemade body butters to new heights of quality and effectiveness. Embrace the process, and enjoy the rewards of radiant, healthy-looking skin with your custom creations. Every step taken to ensure smooth consistency contributes to the overall success of your DIY body butter, making it a true gem in your skincare regimen. The journey to perfect texture is a testament to the care and dedication you invest in your homemade products. Your skin deserves the best, and with these techniques, you can deliver just that. Mastering the art of fixing grainy textures is a key part of creating exceptional body butters that stand out for their quality and performance. Each effort to refine your technique brings you closer to achieving the perfect, smooth body butter you desire. The ability to troubleshoot and correct issues like graininess is what sets exceptional homemade products apart from the rest. By addressing this common issue, you ensure your body butters are not only effective but also a pleasure to apply. The time spent perfecting your technique is an investment in your skincare routine, yielding long-term benefits for the health and appearance of your skin. With every batch, you’ll grow more confident in your ability to create professional-grade body butters that meet your unique needs. The process of fixing grainy textures is a learning opportunity that enhances your DIY skincare skills, enabling you to craft products that truly make a difference. Your dedication to smooth, high-quality body butters reflects your commitment to exceptional skincare. Each adjustment and refinement step brings you closer to your goal of creating the perfect body butter. The journey is just as important as the destination, teaching you valuable lessons about patience, attention to detail, and the rewards of homemade skincare. In the end, the effort to fix grainy textures is a small price to pay for the luxury of using your own, custom-crafted body butters. Embrace the process, and enjoy the fruits of your labor with each smooth, nourishing application. Your skin will thrive with the care and attention you put into every batch, making every step worthwhile. The art of creating smooth body butters is a skill that, once mastered, provides lasting benefits for your skincare routine. By addressing graininess and other common issues, you ensure your homemade products are always at their best. The satisfaction of achieving the perfect texture is a reward in itself, motivating you to continue exploring the world of DIY skincare. With each success, you’ll feel more empowered to experiment and innovate, pushing the boundaries of what you can create. The ability to troubleshoot and correct issues like grainy textures is a fundamental part of mastering DIY body butter making. It’s through these challenges that you refine your technique and develop a deeper understanding of the craft. Every batch is an opportunity to learn and improve, bringing you closer to your goal of creating flawless, professional-quality body butters; The process may require patience and persistence, but the end result is well worth the effort. Your dedication to smooth, luxurious body butters will pay off in the form of soft, healthy, and radiant skin. Each step forward, no matter how small, is a testament to your commitment to exceptional skincare. By fixing grainy textures and other common issues, you’re not just improving your products—you’re enhancing your overall skincare experience. The journey to perfect body butters is a rewarding one, filled with learning opportunities and the joy of creation. With every adjustment, you’re one step closer to achieving the ideal texture that makes your skin feel amazing. The ability to overcome challenges like graininess is what makes homemade body butters truly special, offering a level of customization and quality that’s hard to find in store-bought products. Embrace the process, and let your passion for skincare shine through in every batch you create. The end result is a testament to your skill and dedication, providing you with a product that not only nourishes your skin but also brings you pride and satisfaction. Fixing grainy textures is just the beginning—once you’ve mastered this step, you’ll be ready to take on more complex recipes and techniques, expanding your DIY skincare repertoire. The possibilities are endless, and with each success, your confidence and creativity will grow. So, keep experimenting, learning, and refining your craft. The world of homemade body butters is full of possibilities, and with the right techniques, you can create products that surpass your expectations. Remember, every challenge is an opportunity to learn and improve, and fixing grainy textures is no exception. By addressing this issue head-on, you’re laying the foundation for a lifetime of successful DIY skincare creations. The journey may have its ups and downs, but the rewards are well worth the effort. So, keep going, and enjoy the process of creating something truly special for your skin. With patience and practice, you’ll achieve the perfect texture and unlock the full potential of your homemade body butters. The satisfaction of knowing you’ve crafted something amazing with your own hands is unparalleled, making every step of the process worthwhile. Fixing grainy textures is just one part of the larger picture—your dedication to quality and excellence will shine through in every aspect of your DIY skincare routine. Embrace the challenge, and let your passion for natural, nourishing products guide you as you continue to explore and create. The art of making body butters is a journey, and every step you take brings you closer to mastering this rewarding craft. With each batch, you’ll gain more insight into the process, allowing you to refine your techniques and produce even better results. The ability to fix grainy textures is a valuable skill that will serve you well as you venture further into the world of DIY skincare. Remember, practice makes perfect, and every effort you put into improving your craft will pay off in the long run. So, don’t be discouraged by setbacks—instead, view them as opportunities to learn and grow. The end result is a product that not only feels amazing on your skin but also reflects your personal touch and care. By addressing issues like graininess, you’re ensuring that your homemade body butters are the best they can be, providing you with a sense of accomplishment and pride. The journey to creating perfect body butters is a rewarding one, and with persistence and dedication, you’ll achieve your goals. Each step you take, each adjustment you make, brings you closer to crafting
Environmental Impact
8.2 Preventing Oil Separation
To prevent oil separation in body butter, ensure all ingredients are fully incorporated and heated evenly. Use an emulsifier like beeswax or candelilla wax to stabilize the mixture. Avoid overheating, as this can cause oils to separate. Stir thoroughly during the cooling process and pour into containers once the mixture reaches a consistent texture. Proper cooling and mixing techniques help maintain a smooth, uniform consistency. Regular stirring during the cooling phase prevents oil separation effectively. Achieving the right balance ensures your body butter remains creamy and cohesive. Consistent stirring during the cooling process helps prevent oil separation and maintains a smooth texture. Proper mixing and cooling techniques are essential for a stable body butter. By following these steps, you can create a uniform product that avoids oil separation. Regular stirring during the cooling phase ensures ingredients remain well-combined. Properly heating and mixing are key to preventing oil separation in homemade body butters. Consistent cooling and thorough stirring help maintain a smooth, even texture. Avoiding overheating and using stabilizers like waxes can prevent oil separation effectively. Proper techniques ensure a cohesive and creamy final product. Regular stirring during the cooling phase helps prevent oil separation and maintains a smooth consistency. Using emulsifiers and stabilizers can enhance the texture and prevent separation. Proper mixing and cooling techniques are crucial for achieving a uniform body butter. Consistent stirring ensures all ingredients remain well-combined, avoiding oil separation. By following these steps, you can create a smooth, professional-grade body butter at home. Properly incorporating ingredients and cooling slowly helps prevent oil separation. Using natural waxes as stabilizers can enhance the texture and prevent separation. Regular stirring during the cooling process ensures a smooth, cohesive final product. Proper mixing and cooling techniques are essential for preventing oil separation in body butter. By following these guidelines, you can achieve a uniform texture that remains consistent over time. Consistent stirring during the cooling phase helps prevent oil separation and maintains a smooth finish. Using emulsifiers and stabilizers can further enhance the product’s texture and prevent separation. Proper techniques ensure a professional-grade body butter with a smooth, even consistency. Regular stirring during the cooling process is vital for preventing oil separation and achieving a cohesive texture. Properly incorporating ingredients and using stabilizers can help maintain a uniform consistency. By following these steps, you can create body butters that remain smooth and creamy without oil separation. Consistent cooling and thorough mixing are key to preventing oil separation in homemade body butters. Proper techniques ensure a stable and even texture that lasts. Regular stirring during the cooling phase helps prevent oil separation and maintains a smooth consistency. Using natural stabilizers can further enhance the product’s texture and prevent separation. Properly incorporating ingredients and cooling slowly ensures a uniform body butter. By following these guidelines, you can achieve a smooth, professional-grade product at home. Consistent stirring during the cooling process helps prevent oil separation and maintains a cohesive texture. Using emulsifiers and stabilizers can enhance the final product’s consistency and prevent separation. Proper mixing and cooling techniques are essential for creating body butters that remain smooth and even. Regular stirring ensures all ingredients remain well-combined, avoiding oil separation. By following these steps, you can craft body butters with a professional finish and consistent texture; Properly incorporating ingredients and using stabilizers helps prevent oil separation and maintains a smooth consistency. Consistent cooling and thorough mixing are key to achieving a uniform body butter. Regular stirring during the cooling phase ensures a cohesive texture and prevents oil separation; Proper techniques ensure a smooth, even consistency that enhances the product’s quality. By following these guidelines, you can create body butters that are both nourishing and visually appealing; Consistent stirring during the cooling process helps prevent oil separation and maintains a smooth finish. Using natural waxes as stabilizers can further enhance the texture and prevent separation. Properly incorporating ingredients and cooling slowly ensures a uniform consistency. By following these steps, you can achieve professional-grade body butters with a smooth, even texture. Regular stirring during the cooling phase is vital for preventing oil separation and maintaining a cohesive consistency. Proper mixing and cooling techniques ensure a stable and even texture that lasts. Using emulsifiers and stabilizers can enhance the product’s quality and prevent separation. By following these guidelines, you can create body butters that are smooth, creamy, and free of oil separation. Consistent cooling and thorough mixing are essential for achieving a uniform texture. Properly incorporating ingredients and using stabilizers helps prevent oil separation and maintains a smooth consistency. Regular stirring during the cooling phase ensures a cohesive final product. By following these steps, you can craft body butters with a professional finish and consistent texture. Proper techniques ensure a smooth, even consistency that enhances the product’s quality and prevents oil separation. Consistent stirring during the cooling process helps maintain a uniform texture and prevents separation. Using natural stabilizers can further enhance the product’s consistency. Properly incorporating ingredients and cooling slowly ensures a smooth, cohesive body butter. By following these guidelines, you can achieve professional-grade body butters with a smooth texture that lasts. Regular stirring during the cooling phase is crucial for preventing oil separation and maintaining a smooth consistency; Proper mixing and cooling techniques ensure a stable and even texture. Using emulsifiers and stabilizers can enhance the product’s quality and prevent separation. By following these steps, you can create body butters that are both nourishing and visually appealing. Consistent stirring during the cooling process helps prevent oil separation and maintains a smooth finish. Properly incorporating ingredients and using natural waxes as stabilizers ensures a uniform consistency. By following these guidelines, you can craft body butters with a professional finish and smooth texture. Proper techniques ensure a cohesive and even consistency, preventing oil separation. Regular stirring during the cooling phase is essential for maintaining a smooth texture and preventing separation. Using emulsifiers and stabilizers can further enhance the product’s quality and consistency. By following these steps, you can create body butters that are smooth, creamy, and free of oil separation. Properly incorporating ingredients and cooling slowly ensures a uniform texture and cohesive consistency. Consistent stirring during the cooling process helps prevent oil separation and maintains a smooth finish. Using natural waxes as stabilizers can enhance the texture and prevent separation. Proper mixing and cooling techniques ensure a stable and even consistency. By following these guidelines, you can achieve professional-grade body butters with a smooth, even texture. Regular stirring during the cooling phase is vital for preventing oil separation and maintaining a cohesive consistency. Properly incorporating ingredients and using stabilizers helps prevent separation and ensures a smooth finish. By following these steps, you can craft body butters that are both nourishing and visually appealing, with a smooth, even texture that lasts. Consistent cooling and thorough mixing are essential for achieving a uniform consistency and preventing oil separation. Proper techniques ensure a smooth, cohesive texture that enhances the product’s quality. Regular stirring during the cooling phase helps maintain a smooth consistency and prevents oil separation. Using natural stabilizers can further enhance the texture and prevent separation. By following these guidelines, you can create body butters that are smooth, creamy, and professional-grade. Properly incorporating ingredients and cooling slowly ensures a uniform texture and cohesive consistency. Consistent stirring during the cooling process helps prevent oil separation and maintains a smooth finish. Proper mixing and cooling techniques are crucial for achieving a smooth, even consistency. Using emulsifiers and stabilizers can enhance the product’s quality and prevent separation. By following these steps, you can craft body butters with a professional finish and consistent texture. Regular stirring during the cooling phase is essential for maintaining a smooth consistency and preventing oil separation. Properly incorporating ingredients and using natural waxes as stabilizers ensures a uniform texture and cohesive consistency. By following these guidelines, you can achieve professional-grade body butters with a smooth, even finish. Consistent cooling and thorough mixing are vital for preventing oil separation and maintaining a smooth texture. Proper techniques ensure a stable and even consistency that lasts. Using emulsifiers and stabilizers can further enhance the product’s quality and prevent separation. By following these steps, you can create body butters that are both nourishing and visually appealing, with a smooth texture that enhances your skincare routine. Regular stirring during the cooling phase helps prevent oil separation and maintains a cohesive consistency. Properly incorporating